This is my log of repairing/re-fitting and restoring a 1937 Wurlitzer Model 24 jukebox. Feel free to drop me a note if you have questions.
A jukebox. A lot of (younger) folks can’t connect to what that means. Though am not ‘that’ old, I grew up with a jukebox in a local ice cream joint and I used to bring my little cassette recorder to record the latest hits right from the speaker of that jukebox. The quality of the record wasn’t that great but my allowance budget wasn’t either. Back than I may have been a music pirate – and the Internet wasn’t even invented yet. Now – almost 40 years later I wanted to have my own jukebox.
I collect 78rpm records. Old historical artifacts that are holding the audible memories of times long gone. Shellac records used to be “state of the art” from the early 1900’s to about 1960. Operas, concertos and popular music, swing, blues and early rock’n roll was pressed on brittle records that could be played on mechanical and electronic devices. My jukebox should play those old 78rpms and it should fit my still limited ‘allowance’.
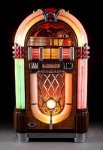 A short primer on jukeboxes (a lot more here). A jukebox is a coin-operated machine that allows to select and play music from a record. These “coin operated phonographs” were found everywhere – even in the best of establishments. Most people who danced during the period 1930-1950 did so to music provided by a jukebox. Three names are associated with jukeboxes: Seeburg, AMI and Wurlitzer. Almost everybody knows the famous Wurlitzer “‘Bubbler’ (image left). If you want one of those machines today, prepare to pay 5 digit dollars if the box is in restored condition.
I am not a gal with that kind of money. And – I wanted a machine to repair and restore myself. My machine should also reflect my main musical taste: Swing. As in Glenn Miller, Benny Goodman, Artie Shaw .. just to name a few.
The story begins:
I finally found a 1937 Wurlitzer Model 24 in New York and bought it.While it was on it’s way to Texas, I ordered the imperative service manual and parts catalog from Ebay. Don’t even think you can look up a needed part from the parts catalog and order it from Wurlitzer Germany (who bought the Wurlitzer jukebox business in the 70s) . I tried – just for the fun of it. Unfortunately they don’t have old parts.
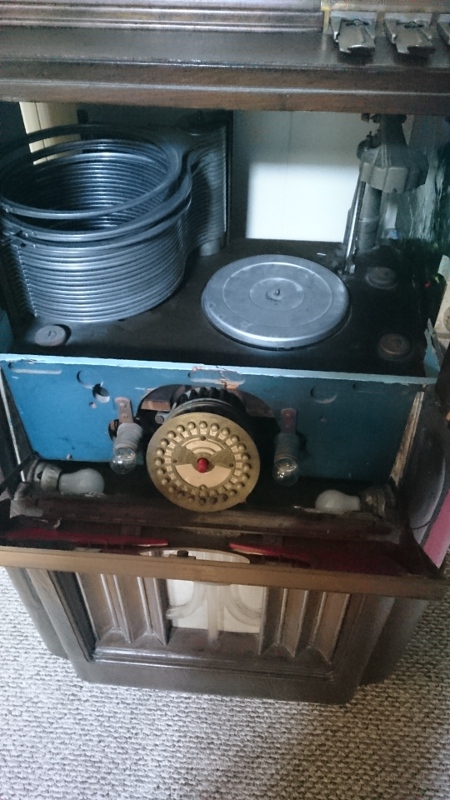
Back to “Johnny” my jukebox. It finally arrived without any problem, Time to check it out:
Coin mechanism, amplifier, volume control, rear panels, title selection board and some other parts missing. Wurlitzer speaker replaced for two generic speakers. Veneer bubbly in places, mechanics sticky, motor re-wired for permanent playing (but still fully working), junction box and cables dangerously corroded. In other words: Time to plug it in 🙂 It springs to life. The first record tray swings out – to my surprise with a record, the tonearm moves into place and as soon as the needle touches the record, I noticed serious shredding action, with little curly shellac chips appearing. Before I could pull the plug, the turn table retracted and the record tray swung back – only to get stuck halfway in. While I was still struggling to get the plug out, the turntable came up again, jamming against the half retracted record tray and though I finally managed to get the plug out, the machine was now completely jammed. But it kind of worked. And that was a good start.
 Make it look good:
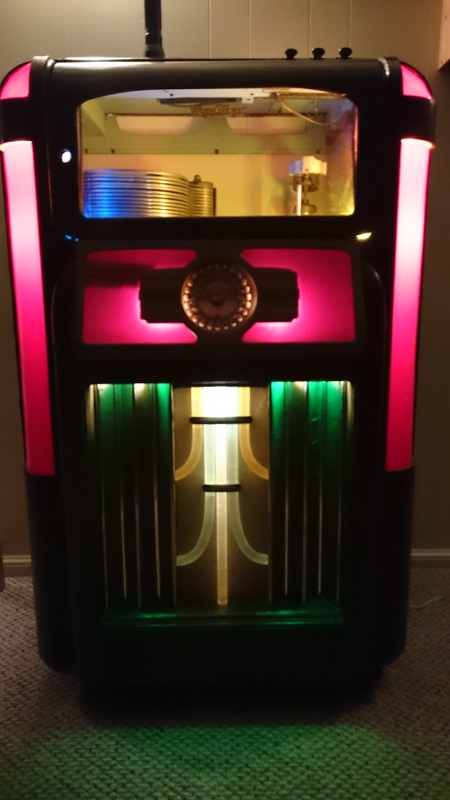
I wish I would have a mansion with dedicated rooms for all of my activities. Until that time, my jukebox has it’s place in the living room. And though it’s not playing (yet), it should look nice. First order of the day: Make it look nice. I gave it a good clean and replaced the light bulbs against LEDs. After just two days, “Johnny” has made it into a really nice piece of furniture.
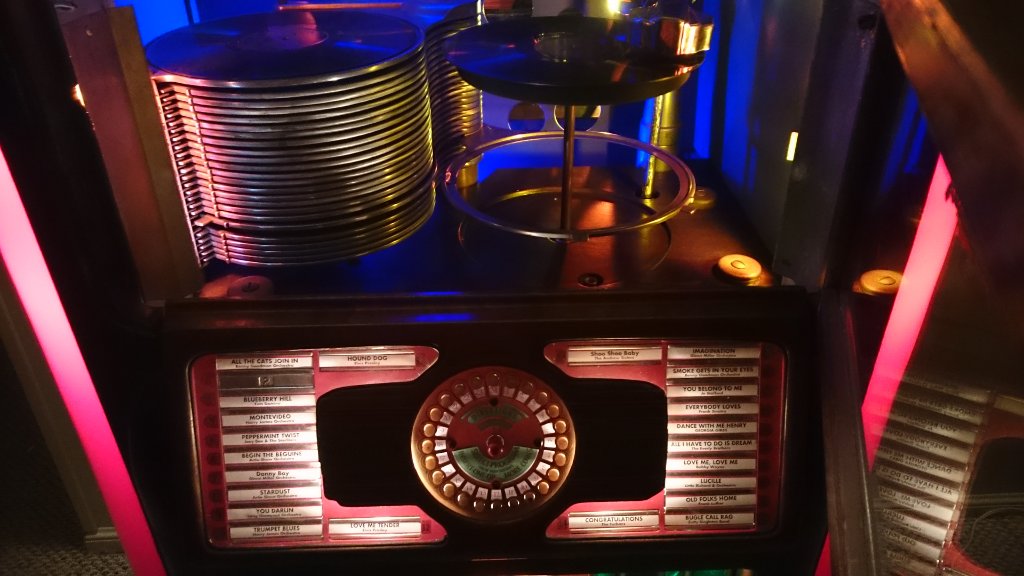
The record stack:
Disassembled and reassembled the record stack. It’s a lot easier to do, if the pullback springs are removed. I am still trying to figure out, what kind of springs they used to pull the record trays back. Took one of it to all local hardware stores but the replacement springs I found where too thick or didn’t have enough strength. I shortened a few worn out old springs and everything works now, but with a jerky action. I will need to replace those springs at some point.
Tone arm:
There was no doubt in my mind, that I will never sacrifice one of my precious records to the grinding and shredding needle monster with a tank like tracking weight. I removed and dissembled the tone arm and ordered a new ASTATIC P-51-1 cartridge from needledaddy1 on Ebay. The folks were nice and put a 78rpm needle on that cartridge before shipping. But I had to adjust the tracking force down to about ten grams. I removed all lead weights from the tone arm and cut the counter weight roughly in half. While having the tonearm out, I contemplated re-chroming it. After emailing a few chroming companies, I decided to just buff it nicely. I couldn’t find a buffing attachment for my drill, so i settled with a “headlight restoring” attachment and some sand paper action. And the tonearm looks nice now. Not re-chromed nice – but nice.
Thoughts:
There are different ways to approach a project like this. Will it be a repair, a refit or a restoration? For now, I decided it to be a repair and refit. I am an IT-Security Engineer, not a carpenter, painter or mechanical engineer. Thanks to my dad (who passed pretty much exactly one year ago) I know how to handle tools. But not to the point that I would be able to get a jukebox into as new or mint condition. So – my goal for this project: I want a nice looking machine that works reliably, sounds great and doesn’t shred my records to pieces. I will continue to watch for parts becoming available and replace stuff piece by piece.
Adjustments:
I cleaned the “engine” as good as possible without removing it from the cabinet (maybe next winter). It took a few days of watching and fiddling to understand the mechanics but I finally adjusted and re-lubed everything into working condition. I found out that the rear coin assembly actually switches the power on and off and since this part was missing, I thought about alternative ways to switch the power. But – lucky me, somebody offered the missing part on Ebay.
 Coin assembly:
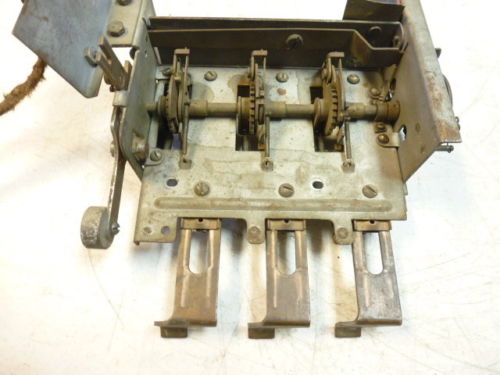
The process of accepting coins and switching the power on and off comes in two parts. Drop a nickel into the brass lever on top of the machine and it allows you to push the lever all the way in. Which in turn pushes the mechanics of the rear assembly (image on left) that will register a credit by turning a cog wheel a notch and switching the power on. When the record is done playing, a linkage rod is pulled by the player mechanics and the cog wheel is pushed back a notch – switching the power off. A simple, yet elegant design. I soaked both assemblies in degreaser overnight and rewired, relubed and installed them the next day. Funny story: At first I thought the parts wouldn’t match as there is a two inch gap between the parts once installed. I was puzzled. Finally it dawned on me: Once you place a coin into the slot, the lever can be pushed all the way in. Du’hh.
Junction box:
All connection and wires end up with plugs that connect to the main junction box. The condition of the connections, switches, receptacles and wiring was not good, with brittle, blank and lose wires and short wired taped connections. In order to run a safe system, the rewiring was mandatory. I removed the box and disassembled it, cutting all wires in the process. That was the easy part. De-soldering the old wires and attaching new wires was much more difficult. Wurlitzer over-soldered the posts on 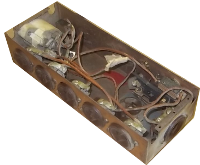 the receptacles including the screws. There was no way I would be able to do anything with my small soldering iron or my 100 watts solder gun. I went out to get more power. Much more power. Blow torch power. That did it. Though the whole house smelled like smoldering shellack and I burned a few things learning to work with a blow torch, I finally manged to rewire and re-solder everything nicely and safely. reusing the original Wurlitzer switches and receptacles.
Adjustments (2):
Most of the mechanics can be adjusted pretty easily and reliably. One particular setting gave me a lot to think about. The tone arm is pushed all the way to the right to allow the record to be put on or taken off the platter. In order to play the record, the tonearm needs to be pushed back before it is lowered into the lead-in groove of the record. This is done by a drop-weight that gives the tonearm a small whack to push it a little to the left. Whatever I tried to adjust, it didn’t work. The tonearm was either pushed way too far into the record, or not far enough. Sometimes it was just right, sometimes it was way off. It took me three days to find the two problems responsible for that. First. My tonearm was gutted and modified to just about 9 grams of tracking force, While the 10 gram drop weight was just right to move a lead filled heavy tonearm, it knocked my “light weight” tonearm almost an inch into the record. Second: A little brass nipple was meant to stop the the swing motion at the low point. That nipple had sheered off so the drop weight mechanism pushed the tonearm further than intended. I experimented with lower drop weights and finally ended up with a 2 gram lead weight from my fishing tackle box. I drilled a small hole into the frame and installed a pin to stop the motion of the drop down after about 45 degrees. This positions the tonearm perfectly for almost all records. Update: I got it wrong. After re-reading the service manual I finally understood the positioning mechanism. Turns out there’s a little latch on the tone arm that is pushed against the tray post by the mentioned drop weight. (it was missing on my box). It should be adjusted so that the needle touches the outer rim of the record. When the record lifts the tonearm, the latch is lifted over the top of the post and the drop weight pushes the needle into the lead-in groove. I manufactured a little latch and bend it into position. Works really great now.
 Amplifier:
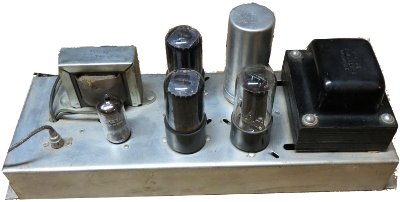
As mentioned before, the jukebox came without amplifier. I used a small solid state guitar amp for my experimenting, but I wanted some tubes in my box. Since the original Wurlitzer speaker was also missing, I decided to go more ‘modern’ . The old Wurlitzer sound system used a 15 inch speaker with a separate 3200 ohm field coil and a 8 ohm voice coil. Its hard to find a usable original speaker and the available original Wurlitzer amps usually need a lot of rebuilding. I had an old Magnavox (image left) 10 watt tube amplifier available and wired it into my jukebox. As usual, if you are not looking for a part, you find it anyway. In this case, I found a beautifully restored 700 type amplifier. Though not exactly the right type but very close to my system. And it was modified to drive a more modern single coil speaker. I haven’t installed this amp yet because this baby produces so much power, that I need to install some form of volume control first (as the original volume control box is missing).
Update: Title strip holder
The title strip holder is one of those parts unique to the model 24 (it shares a lot of other parts with other models), it is unfortunately often missing and very hard to find. I knew from the beginning, that “Johnny” would come without it and started to look for one even before the jukebox arrived. This video gives you a good impression how a “Model 24” should look like, including the title strip holder. To make a long story short: I was able to find somebody with a few boxes of spares – including a title strip holder. Though one of the glass covers is broken and it will need a good clean and repainting, I couldn’t wait to install it.
 Status: March 4th, 2015
The jukebox plays records. All major parts installed or repaired. Record selection works, tonearm rebuild with light weight mono-cartridge, positioning (start of record, end of record) works perfectly, still using the Magavox amplifier though. Coin gear accepts coins and gives and takes the appropriate credits. I am still missing the link between the coin gear on top of the machine and the chute leading to the coin box. Built a temporary “bridge” from light weight aluminum, but coins get stuck in there sometimes. I am starting to trust the machine and actually put two of my more valuable records in there. Still having problems that the turntable center pin misses the record hole sometimes. Wouldn’t run the machine without supervision currently, but it is already a lot of fun to see a 78 years old piece of technology work. I am very impressed how the engineers manged to get everything working and I learned one important fact: Each and every part, doesn’t matter how small, has it’s function. Very, very cool.
Update: Title Strip Holder (2)
After cleaning and buffing the selections brass mask , my husband and I worked all evening to create title strips and the “Directions” information. Both were designed and color printed, than cut to fit. Whoever is interested in the layouts, drop me a note. It was tough to cut a round transparent plastic cover for the center “Directions” sections, as the hard “Plexiglas” type plastic tends to crack around the cutting edges. While that doesn’t matter if you have some covering or overlap, there is no cover or overlap in the center. I had to settle with a more soft plastic. But it was fun: I thought long and hard about the first “load” to go into the machine, because I had to create the title strips for it. I finally selected a mix of swing, rock’n roll and some slow stuff. Interesting fact: Only one record in the current load would have been available at the time “Johnny The Jukebox” was built.
Update: Amplifier
The small guitar amp was never meant to be a permanent solution for my jukebox. I was on the lookout for more – well – juice. Additionally, Wurlitzer amps have a quick start circuit that gets the amp ready in the time for the mechanics to bring the first record to the needle. They do that by applying just a little more voltage to the tubes for a few seconds in order to get them warm fast(er). So .. I got myself a rebuilt / refurbished Wurlitzer 70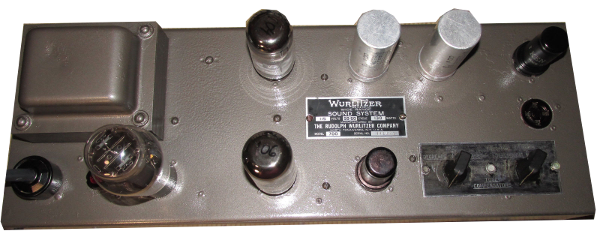 0 amplifier. Not exactly matching the model for my system – but very close and boy .. what a sound this amp has 🙂 Which brought me to the next problem: My jukebox didn’t have a volume control anymore. With the new ceramic cartridge producing way more voltage than the old system, this amplifier was like a steam hammer in my living room. I rigged a temporary volume control with a few resistors and a potentiometer and .. well .. I was finally able to listen to the tunes with the right volume.
Adjustment (3) :
While the box was selecting the records ok, I still had the problem that the records didn’t always line up with the center pin of the platter. I should have read the instructions more carefully. Because one can adjust the stop rod to make the tray holders stop swinging out at just the right moment. After understanding and adjusting, everything worked flawlessly – most of the time. Still – on very few occasions, the records may miss the center pin by a few fractions of an inch. Usually it slides in as soon as the needle touches the record. At one time though, the record started playing without the pin finding the center hole in the record. My husband who was watching said: I guess it’s one of the times the patrons usually kicked the jukebox into submission. I guess that’s what happened a few decades ago, but nobody is going to kick a senior citizen, in my house even if it is made out of wood and metal. I guess a have to adjust it a tiny bit more.
Update: Amplifier (2):
Did I mentioned the humming? It was bad at the beginning, I got it mostly under control with my rigged volume 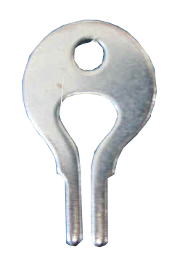 control – but it wasn’t the way it was supposed to be. The real trouble started with the ‘new’ volume control box I was able to secure – including the special Wurlitzer key. This key allowed the operator to change the volume to the desired level and nobody without a key was able to modify the setting. Anyway – the volume control was made to work with the original cartridge and didn’t work well with the new one. While I was trying to build a new volume control with the old parts (gutted from several volume control boxes) I noticed that I just couldn’t get the humming under control. It was nerve wrecking. But almost all problems have a solution. It took me a while to remember an old trick somebody told me some time ago. The old systems didn’t have polarized plugs. The humming problem was solved completely by pulling the plug, turning it 180 degrees and plug it back in. With this problem solved, I could easily build my new volume control which is now working perfectly and exactly the way it is supposed to.
Update MP3:
Its a sacrilege. Or is it? My Wurlitzer has 24 records. This is a rather limited selection. And a few of my favorite songs are not even available on 78rpms. So, I had a  few options: One can have a 78rpm record cut with any song one wants (actually: two songs on both sides) which costs about a hundred dollars. Or one could “extend” the jukebox to play any music. By (carefully) adding MP3 capabilities. Being an IT professional, I selected option 2. Here are the requirements: The extension should be easily removable, it should in now way limit the record playing capabilities, it should not need any network (not even wireless) and it should “blend” in. Here’s what I did: I had an original Wurlitzer volume control box sized (shortened) to fit in the model 24. I installed an Arduino computer with an MP3 shield, wired a few buttons (next song, previous song) and a volume control (to match the signal strength of the cartridge). When I turn it own, it disconnects the cartridge from the Wurlitzer volume control and connects the MP3 player to it. It also switches a relay that turns the amp and the lights on. It waits about 10 seconds for the amp to get ready and starts playing whatever is on the SD card or USB stick. The connections are fairly simple. The cartridge plugs into the MP3 box and the output of the box feeds into the original Wurlitzer volume control (see above). A simple low voltage cable feeds into a relay in the junction box to control lights and the amplifier. Switch the box on and you have hours and hours of MP3. Switch it off and its back to records.
No. I don’t think its a sacrilege. Its an extension that allows me to use my jukebox more often.
Current status (April 21st, 2015)
My jukebox plays music from records and USB sticks (SD cards). I am still tinkering with a few (record playing related) adjusting issues. I had to re-adjust the tonearm height to allow the box to play the top most record (number 24). This was easier said the done. Because the tonearm with the new pickup needs more vertical room than available. This was impossible without also adjusting the needle pressure screw. That is unfortunately limiting the vertical play of the tonearm to a point, where the needle doesn’t even touch the record anymore. It was a lot of try and error to find the “sweet spot”. But I got it working. I also found and installed a chute to connect the coin gear to the coin box. My jukebox is now able to accept nickels, dimes and quarters (1, 2 and 5 plays). I also solved another issue with the lead in. The already reduced weight was still pushing to much weight to the tonearm and it sometimes skipped over a few grooves while starting to play the record. I cut the weight again and it now finds the lead in groove without too much skipping on almost all records. I will have to reduce the weight even more. I didn’t start the wood work. I am however looking around for somebody to help me with the veneer. This is not going to be done until autumn or winter though. Because I am currently very busy trying to make the money I need to spend on my little Wurlitzer. Stay tuned for more little (or bigger) updates.
Update (June 1st, 2015)
The front grill (the area that covers the speaker) has always been on my “ToDo” list. Its is basically a wire mesh with a cloth cover, hold by nailed strips under aluminum ‘slide in’ type covers and two ‘tension’ rods. The old cloth looked worn and ugly, all the dirt collected over the years made it hard and brittle. I touched it while playing some music and it actually vibrated – indicating that the sound waves were no longer passing through it. It had to be replaced. Click the image to the left to see the difference.
Fortunately, one can get really cool gold glittering speaker cloth from Victory Glass. I removed the two rods and carefully pried the nailed strips off the wood. Next task: Strip the old cloth off the mesh. 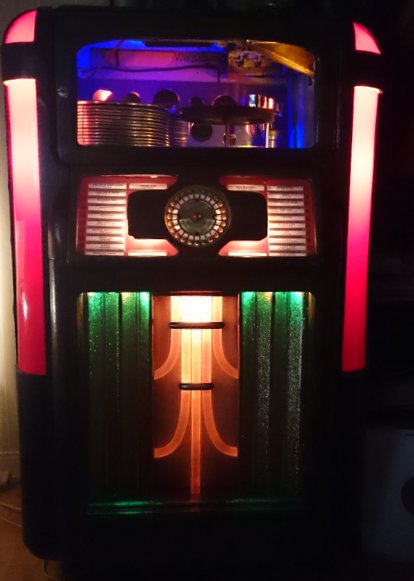
Using spray glue I tacked the roughly cut new cloth to the mesh and started gluing it from the outside to the inside while carefully avoiding folds. After the cloth was attached, I let it sit to dry a bit and re-attached the nail strips, aluminum covers and rods. The final step was to cut overhangs close to the nail strips and to clean the area of any glue residue and tiny little glitter threads that got lose from the cloth wile cutting and adjusting. First side done. Let’s do the other side.
The new gold glitter cover looks really good – but it sparkles to life as soon as the lights are low and the jukebox starts playing.
Update: Pickup System (1):
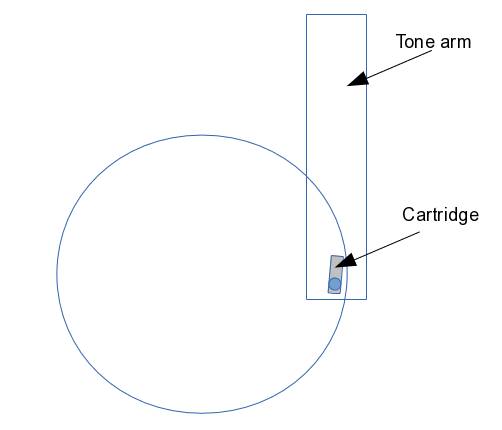
I already exchanged the original heavy-weight pickup system with a more suitable, light weight ceramic cartridge. While I made sure that the weight complies with the limitation of the cartridge, I didn’t pay a lot attention to the correct tracking angle. Now – that I am a proud owner of a complete, mint set of reproduction 78rpm vinyl records, I needed to address this issue in order to not damage those valuable records. I disassembled the tone arm and, after a few measurements and calculations, adjusted the cartridge with a 23 degree angle. This is not only to reduce the tracking error, but also to avoid damage to the leading (outside) groove which may otherwise force the needle to move against its designed freedom of motion. The result was audible right away. The needle now follows both groove walls more closely thus producing better sound with less noise.
Update: MP3 (1)
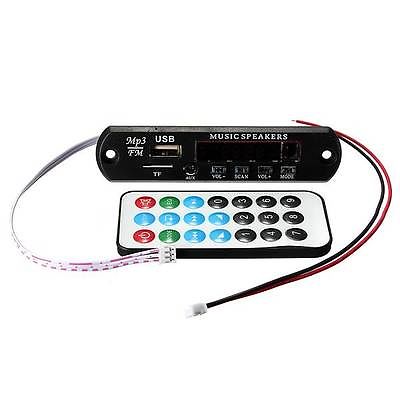 I had a lot of trouble to get the Arduino / MP3 shield working correctly. Though the mp3-box was added to my jukebox, it didn’t feel the way it should (the unit skipped songs, sometimes didn’t start at all… ) . I recently purchased an MP3 module that is also capable of Bluetooth connections, comes with a remote and has an inbuilt FM radio. To be honest: I didn’t expect too much from it. After all – it’s less than 10 dollars NEW.
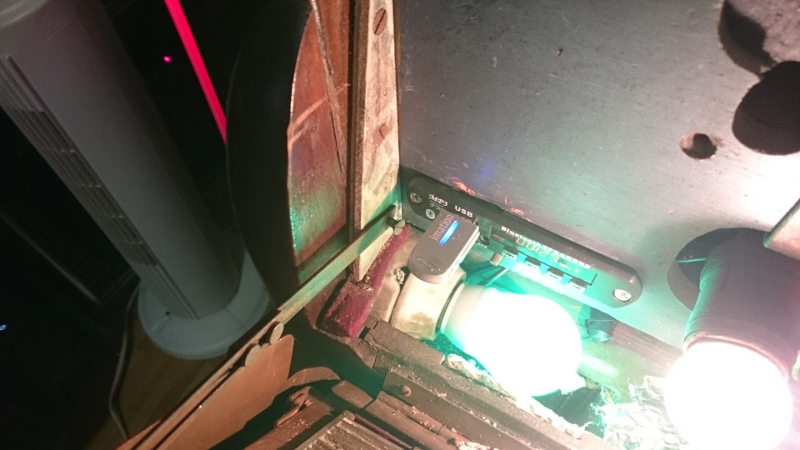
Anyway, I played around with the unit and to my utter amazement, that little plastic thing was exactly what I was looking for. Not only does it sound really good, it also has in inbuilt equalizer and, more importantly, it ‘remembers’ the settings after power down. It took me about an hour to find a spot for the unit and it’s now happily providing all the background music I was looking for.
So – if you are looking to put a bit more ‘bang’ into an old music-workhorse: Consider this little unit. It’s less than 10 bucks (on Ebay) and its worth every penny.
Update: December 21th, 2015
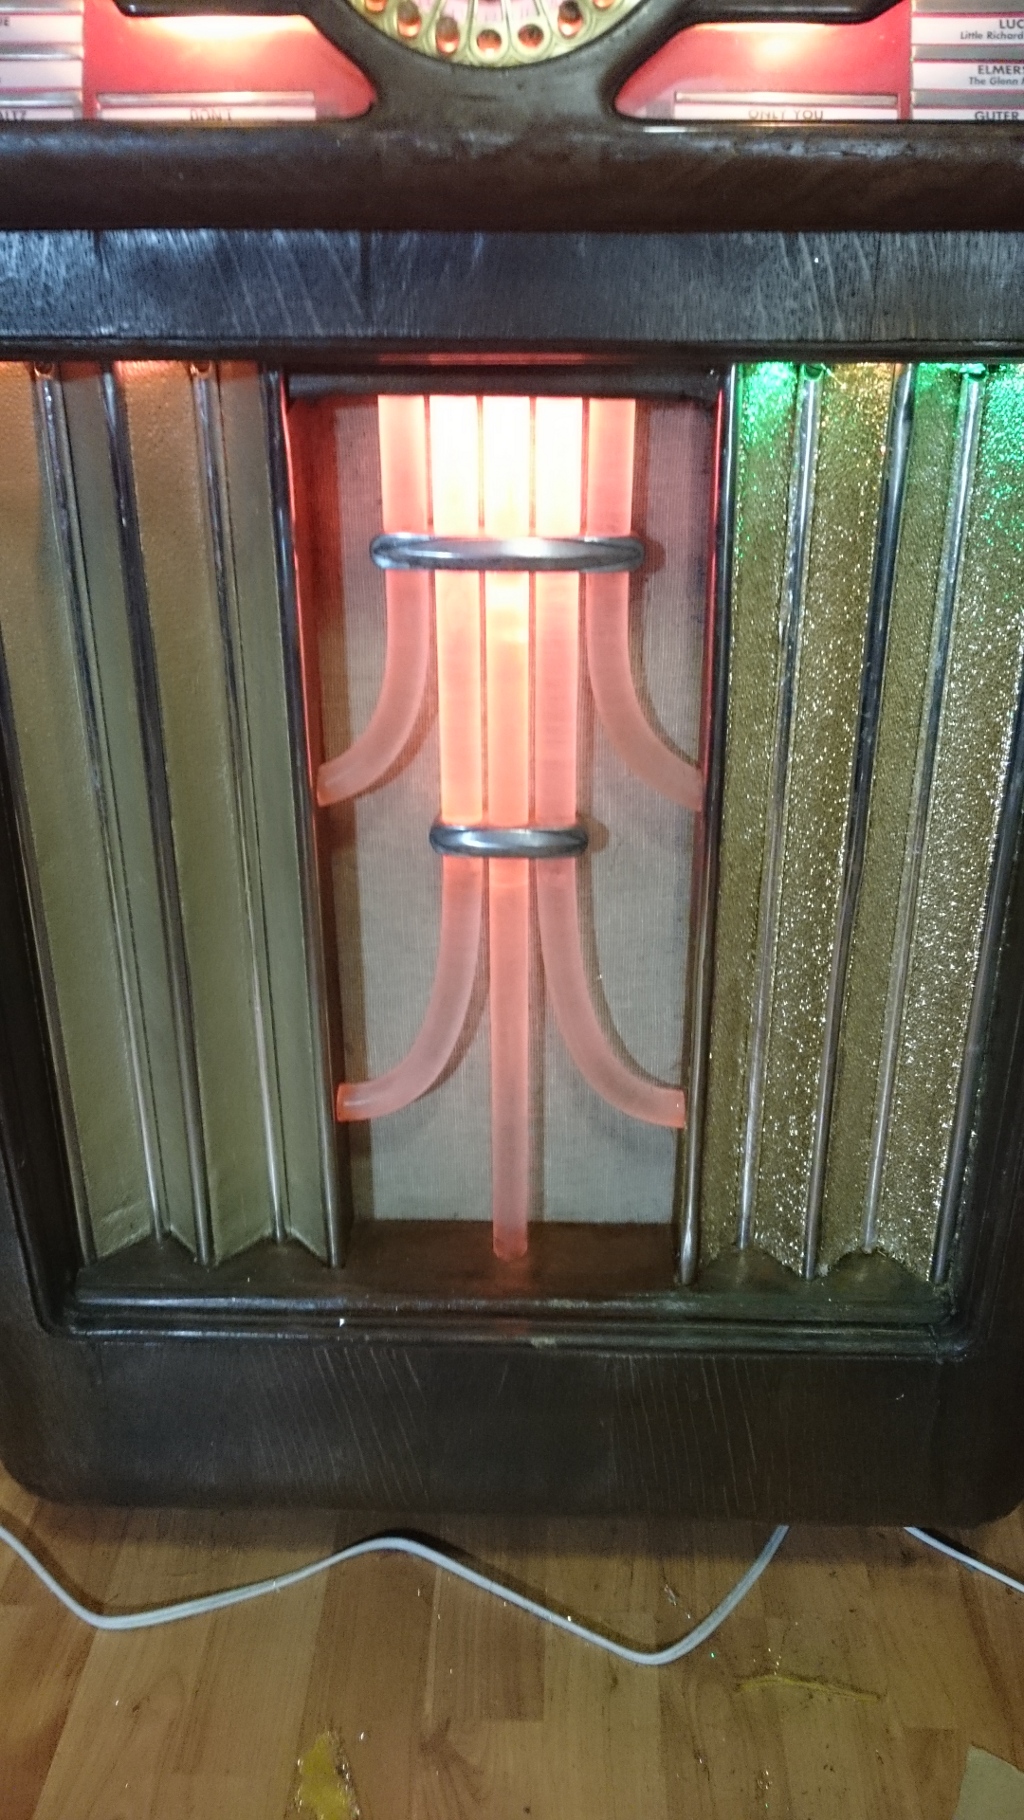
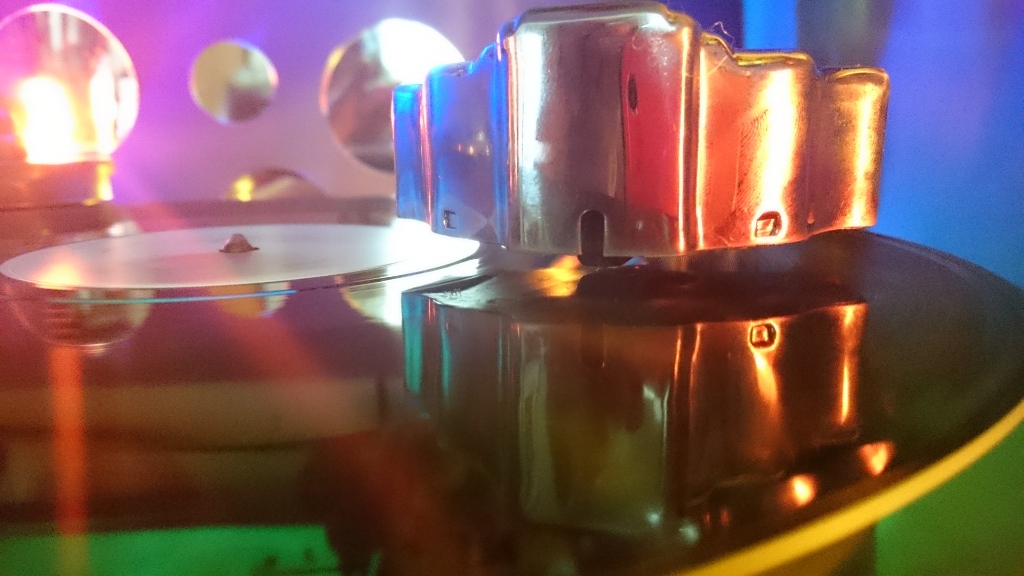
TheType24 is not as fancy  as later Wurlitzer models. But Paul Fuller, the designer, had the cool idea to install 5 plastic lucid rods into the front grill. Those rods had little color filters on top and were illuminated by a regular white light bulb. The light and the filters would illuminate the rods with different colors giving the jukebox a nice accent. My filters where mostly broken so I replaced the ordinary white bulb with a color LED bulb and that looked quite nice.
But I wanted even more colors.
I installed a 12 Volt power supply to feed a number of colored LEDs on top of the rods and that made a big difference. It also reduced the heat in the box (and the room) and gave me the choice to select any color I wanted.
As the LEDs are somewhat brighter than the color-filtered light bulb, the rods look great. But if the light is low, the Wurli really shows it’s beauty. Who needs bubbles?
Update: May 16th, 2016
Well – there’s not much to update. The box works fine, I had to re-adjust the record selection rod as it got stuck and selected two records at the same time (if you don’t catch that, it may burn up your motor or the clutch) – but other than that, everything is good. I still haven’t found the time to continue the restoration, to find back doors and to deep-clean the mechanics. But it’s on my agenda. So – stay tuned.
I’m not sure about the Red or Yellow plastics, But there was a Model 24 and a 24A so that may be where the different colours came from. Other than that, yes I believe the W 600 red plastics fit the 24 as well.
For the yellow plastics, check the “usual suspects” shown on Phonoland as suppliers, particularly the Jukebox Graveyard, John Durphy, an coin op warehouse.
Hope these thoughts help
Paul
P.S. My 24 was set up for 45s and although I located the 78 gears, I have left it on 45s but stocked it primarily with Jolson) and a few Glen Miller records.
Thank you Paul. The red plastics look fine and exchanging them is not a matter of urgency. As to the 45rpm conversion: I thought about that too and would have done it without changing the gear by using a frequency converter to adjust the speed of the motor. But I kept it on 78rpm because and found myself of 45rpm jukebox.
Dear Ms. Merz,
What a wonderful story. The restoration was very interesting. It looks as though Glenn Miller is standing next to that exact model in the photograph I shared.
Would that I, too, could find a like-model Wulitzer.
Now, I wonder whatever became of those Glenn Miller ‘Sunset Serenade’ /’Chesterfield Show’ radio -phonograph combinations sent to the various winning service camps ? I wonder also if there may have had some inscribed plate “To the service personnel of __________. Best Wishes From Glenn Miller and The Makers of Chesterfield Cigarettes…….”
Thank you, Mr. Mittler. From what I have learned, Wurlitzer destroyed returned wooden jukeboxes when they were exchanged for more modern machines. This unfortunately limits the availability of those old machines. This having said: There are still quite a few out there. I was on a live auction a few weeks ago where an original, almost flawless Type 24 was sold below 3,000 Dollars. I paid about 700 Dollars for mine (in un-restored condition), invested countless hours and about 2,000 Dollars to get it into the condition it is in now. And it will take another year and probably another 1000 Bucks or so to get it ready. But that’s ok. My jukebox sits in the office, it is playing every day (we have a special song to be played when it is time to go home) and it has become part of the family. If you really want one – set up a search notification on Ebay and Craigslist – you will get your chance.
Michaela
Hi Michaela,
Loved your restoration story. I was a former owner of a W24. It was in decent condition, but had to sell it when I moved to a smaller house. It ended up gong to Japan, of all places. I did keep a W412, and thought I would pick your brain on how to deal with a tracking issue. The juke is level, but the tonearm 90% of the time retracts too far to the right, and misses the record. The tonearm does have a screwed in small plate that have set for the maximum to the left. Any suggestions? PS: Would love the layout specs you have for printing 78 title labels.
Thanks! – Jose
Hi Jose:
Thanks for your comment. The issue of hitting the lead-in groove puzzled me quite some time, but it’s actually pretty easy (on the 24). There’s a little weight in the mechanics that pushes the tone arm towards the record. The tone arm itself has a little latch that hits the post at the point where the needle is supposed to touch the record.
So .. the complete process: The tone arm swings back after the record has been played. This process lifts a little rocker arm with a small weight inside the mechanics. The new record swings out, the weight pushes the tone arm to the left towards the record until the little latch hits the stop post. The record lifts the tone arm (with the latch) over the post and the process is done.
Feel free to ask me more questions. Glad to help out.
Michaela
Perfect record to play. Benny Goodman’s All the Cats Joined In
I was fortunate to be the new owner of a Wulitzer Juke box. I’m still collecting all the information I can on it and I assumed it was a 1938 model24 but maybe it’s a 1937. The original owner passed away two years ago and the family gave it to me. It doesn’t work but all the parts and end even the keys and records are still in it. The wiring is shot and that will be my first thing to replace but any information on what to restore and not to restore would be much appreciated. This is something I don’t want to ruin by restoring it and devaluing it in the process.
Any direction at this time would be helpful
Howdy Ken – and congratulations. I am sure you will enjoy all the work that needs to be done to get your Wurli spinning again. While the wiring and the junction box most likely need some attention, I would first look at the mechanics. As a matter of fact – I would disassemble the box and get the mechanics out to give it a good clean and lube. Avoid the taking apart the mechanics – it’s complicated to get everything assembled again. I sent you an email so that we can continue the discussion privately.
Michaela
Hi michaelamerz I was looking at your restoration of the Wurlitzer 24 I also have one and wanted to no if you would be kind enough to send me a template for the directions indicator I will pay you for template if you have one many thanks lee
Hey Lee – I have to look if I still have it somewhere. You are talking about the center of the number selector?
Here’s a PDF. I can also give you a CS-6 . Let me know.
http://blog.michaelamerz.com/wordpress/wp-content/uploads/2019/03/Wurlitzer_number_disc.pdf
Hi Michaela,
Congratulation to your restoration works. I am really faszinated about the bluetooth adapter and how it works. I droped you a note through the “Contact Me” form on the top right of this site a few days ago. I hope you received it …
Thanks and best wishes,
Chris 🙂
I have a similar model that I think is from 1937. i need to dust it off and see if it still works.
I like that you talked about how you wanted to restore a jukebox that you’ve found to play your favorite music genre, swing. It is also the favorite type of music of my uncle. So I plan to get him a jukebox for his 55th birthday. A friend of mine is offering their jukebox for a great price, but there are things to be repaired on it. I still think it’s a great buy, so I agreed and will just look for a good repairman soon. Thanks!
Ran across this tonight for the first time. I owned all the fancy light up Wurlitzers back in the 90’s EXCEPT the 24! Could never find one with correct, good pilaster plastics. I’m now 72 and back into it. Got a 950 first, the hard one. Now restoring a 600 and the an 800. I found your idea of LED’s for the rods very ingenious and it looks great. You could probably find somebody to send you “blueprints” for the 2 back doors. Although Wurlitzer used oak boards with veneer for those, regular plywood would work. A lot of time has gone by since this was written so you be done by now! Good read here for sure, and good job!